
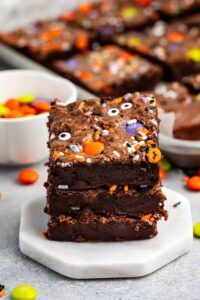
Baking up a spooky treat for Halloween is always a good time, and brownies are a fun way to get creative. With a few easy tweaks, classic brownies turn into something that looks right at home on a trick-or-treat table. This recipe is a staple in my fall baking rotation because it’s quick, rich, and leaves plenty of room for decorating and customizing, which is perfect for home bakers of any experience level.
Why Halloween Brownies Are Always a Hit
Halloween brownies bring together two favorites: classic chocolate brownies and the playful spirit of Halloween. Brownies are pretty low stress to make and hold up well to all sorts of toppings, so you can let it rip with your favorite candies, spooky colors, or even edible googly eyes. You don’t need fancy equipment or advanced skills to pull this off, and these are always a crowd-pleaser at office parties, school events, or dessert tables for a cozy night in.
The flexibility of this recipe really lets you work with what you have in your kitchen. Whether you’re going for a simple fudge brownie with festive sprinkles or a full-on graveyard scene with cookie tombstones, you can easily customize things to fit your style (or what the kids ask for this year). There’s so much room to get creative each time you whip them up.
Gather Your Halloween Brownie Ingredients
I lean on a solid chewy brownie base because it gives a sturdy foundation for plenty of decorations and holds up to cutting into fun shapes. Here’s what you’ll need for both the brownies and some topping ideas:
- Unsalted butter: I always use real butter for the best flavor and texture.
- Granulated sugar and brown sugar: Brown sugar adds a bit of chew and a richer flavor.
- Cocoa powder: Good quality unsweetened cocoa makes a big difference.
- Allpurpose flour: Nothing fancy required, just the basics.
- Eggs: Help with the chewy structure—you’ll need a couple large ones.
- Vanilla extract and salt: Don’t skip these, they bring out the chocolate flavor.
For the toppings and decorations, the options are wide open. Here are some super easy ideas:
- Candy eyeballs
- Halloween themed sprinkles (orange, purple, green, and black always look good)
- Melted white chocolate (great for webs or “mummy” stripes)
- Crushed Oreos for “dirt”
- Pretzel sticks (they make fun broomsticks or bones)
- Candy pumpkins or candy corn
StepbyStep: How to Make Chewy Halloween Brownies
Getting these brownies in the oven takes about 15 minutes, just enough time to round up your helpers! I like to line my baking pan with parchment for easy removal and cleaner edges when slicing.
- Preheat the oven to 350°F (175°C) and line an 8x8inch or 9x9inch baking dish with parchment paper.
- Melt 1/2 cup (1 stick) unsalted butter in the microwave or on the stove. Pour into a medium mixing bowl.
- Whisk in 1 cup granulated sugar and 1/4 cup packed brown sugar until it starts to look glossy.
- Add two large eggs and 1 teaspoon vanilla extract. Whisk for a full minute. This helps give that shiny, crackly top.
- Stir in 2/3 cup unsweetened cocoa powder, 3/4 cup allpurpose flour, and 1/2 teaspoon salt. I usually sift the cocoa to avoid lumps. Gently fold everything together until just combined, but don’t overmix.
- Pour batter into your lined baking dish and smooth it out.
- Bake for 23-28 minutes, or until a toothpick poked in the center comes out with just a few moist crumbs. Start checking at the 23minute mark if you like them extra fudgy.
- Let brownies cool in the pan at least 20-30 minutes before removing. If you’re decorating with melted chocolate or lots of frosting, wait until they’re cool to the touch.
If you appreciate brownies with shiny tops and chewy centers, don’t skimp on whisking and don’t overbake—oven times can vary a bit, so start checking at the low end of the baking window.
Decorating Your Halloween Brownies
This is where you get to have some fun. Since brownies offer a nice flat surface and sturdy base, they’re basically a blank canvas for edible spooky art. Here are a few of my favorite ways to make them extra festive:
- Mummy Brownies: Drizzle thin lines of melted white chocolate or vanilla candy coating across each piece and pop on two candy eyeballs. So easy, and kids go wild for them.
- Spiderweb Brownies: Use melted white chocolate or icing. Pipe concentric circles, then drag a toothpick from the center out to the edges.
- Monster Mash: Scatter candy eyes, colored sprinkles, and little dabs of neoncolored frosting for a creature party vibe.
- Graveyard Brownies: Stick in a cookie “tombstone,” sprinkle crushed Oreos for dirt, and add boneshaped candies or pumpkins for the full graveyard look.
No matter how fancy you get, the brownies themselves are delicious, so there’s really no wrong way to dress them up. For the best decorating experience, make sure the brownies are fully cool before you add anything gooey or melty. If you want to add some extra eye-catching touches, use colored icing to pipe bats or spider shapes over the top, or gently press colored candies into the surface for pops of Halloween color.
Common Halloween Brownie Questions
Halloween brownies come with a lot of creative room, and I get plenty of questions about swaps and troubleshooting. Here are a few that come up most often in my inbox and at neighborhood bake sales:
Question: Can I make these brownies ahead of time?
Answer: Yes, and I do this a lot. Baked brownies (undecorated) will stay fresh in an airtight container at room temp for up to three days. You can freeze them, too; just wrap tightly and add decorations the day of your event for best looks.
Question: Can I use a boxed brownie mix instead of homemade?
Answer: Absolutely. Boxed mixes are handy and still taste great. Just follow the box instructions, bake, and decorate as usual.
Question: What if I want to make these brownies gluten free?
Answer: Swap out the flour for a 1:1 glutenfree flour blend. I get good results with most store brands, and the brownies stay chewy and fudgy.
Question: Can kids help with the decorating?
Answer: Decorating is a perfect job for kids! Just set out toppings in small bowls and go over any tools (like piping bags or sticks) first so everyone knows how to use them safely.
Tips for Perfect Halloween Brownies, Every Time
A few tricks can really help your brownies come out great, no matter how wild you get with toppings:
- Don’t overbake. Brownies firm up as they cool, and Halloween decorations can get messy if the surface is too crusty.
- Line your baking pan with parchment. This makes it easy to lift out the whole batch and cut clean squares or shapes.
- Let brownies cool before decorating. Hot brownies will melt icing or puddle your chocolate webs.
- Have fun with shapes. Use a knife or cookie cutter to make pumpkins, bats, or ghosts. Just press firmly and lift out gently.
- Chunk or swirl extras. If you want, swirl a bit of orange food coloring into the batter or stuff candy pieces inside before baking for pops of Halloween color.
Being creative and flexible is a great way to keep the process stressfree. Experiment with flavors, toppings, and shapes each year for new Halloween classics.
Halloween Brownies for All Occasions
These brownies fit just about any fall event. They’re a goto for potlucks, school classroom treats, or an easy dessert for a Halloween movie night. You can double the batch for big groups or halve it for a small family treat. It’s easy to wrap up individually as party favors, too. A little parchment and some twine and you’ve got a festive, tasty party favor that doesn’t take all afternoon to put together.
Brownies also make great gifts for teachers or neighbors, wrapped up in clear bags and tied with seasonal ribbons. Their sturdy, chewy texture means they travel well and last a couple of days without getting stale, which is perfect when you’re prepping ahead of time for a Halloween bash or trick-or-treat afterparty.
Halloween Brownie Flavor Twists
If you want to play around with the flavor, there are plenty of ways to give your brownies some extra personality:
- Stir chopped Halloween candy (like peanut butter cups or candy bars) right into the batter
- Add orange zest for a chocolate-orange combo
- Mix in a swirl of peanut butter or caramel before baking
- For a spicy kick, add a pinch of cinnamon and cayenne to the batter
Brownies are forgiving and take well to all sorts of mixins, so it’s a good spot to experiment. You can even layer in cookies or sandwich some marshmallows between two thin brownie layers for a gooey s’mores vibe. Trying different combinations helps you stumble upon new favorites your family will request year after year.
Easy Ways to Serve and Store Halloween Brownies
Once the decorating is done, go ahead and slice your brownies into 16 squares or fun shapes with a cookie cutter. If you’re packing them to go, just separate layers with wax paper so your designs stay sharp. I’ve found brownies keep best in a covered container at room temp for 2-3 days, or you can chill them if you like extrachewy brownies. For longer storage, the freezer is your friend, just hold off on most decorations until after thawing.
For bake sales or parties, layer brownies in paper cupcake liners or slip into small treat bags for easy grabandgo snacking. Make sure to label any special flavors or allergens so guests know what they’re getting. If you’re storing decorated brownies, keep them in a single layer as much as you can so frosting and toppings don’t get squished or smudged.
Wrapping Up
Baking Halloween brownies is a sweet way to spend some creative time in the kitchen and get into the spirit of the season. You only need simple pantry staples, a bit of festive flair, and about an hour from start to finish. Whether you go all out on spooky decorations or keep it simple with Halloween sprinkles, these brownies are always a hit and are super fun to make. The best part is, every batch is different, and they almost always get a smile—even from selfproclaimed chocolate snobs. There’s really no wrong way to bring these Halloween brownies to life, so go ahead and let your creativity and sweet tooth lead the way. Whip up a batch this season and enjoy sharing a little homebaked eye-catching Halloween magic with your friends and family.