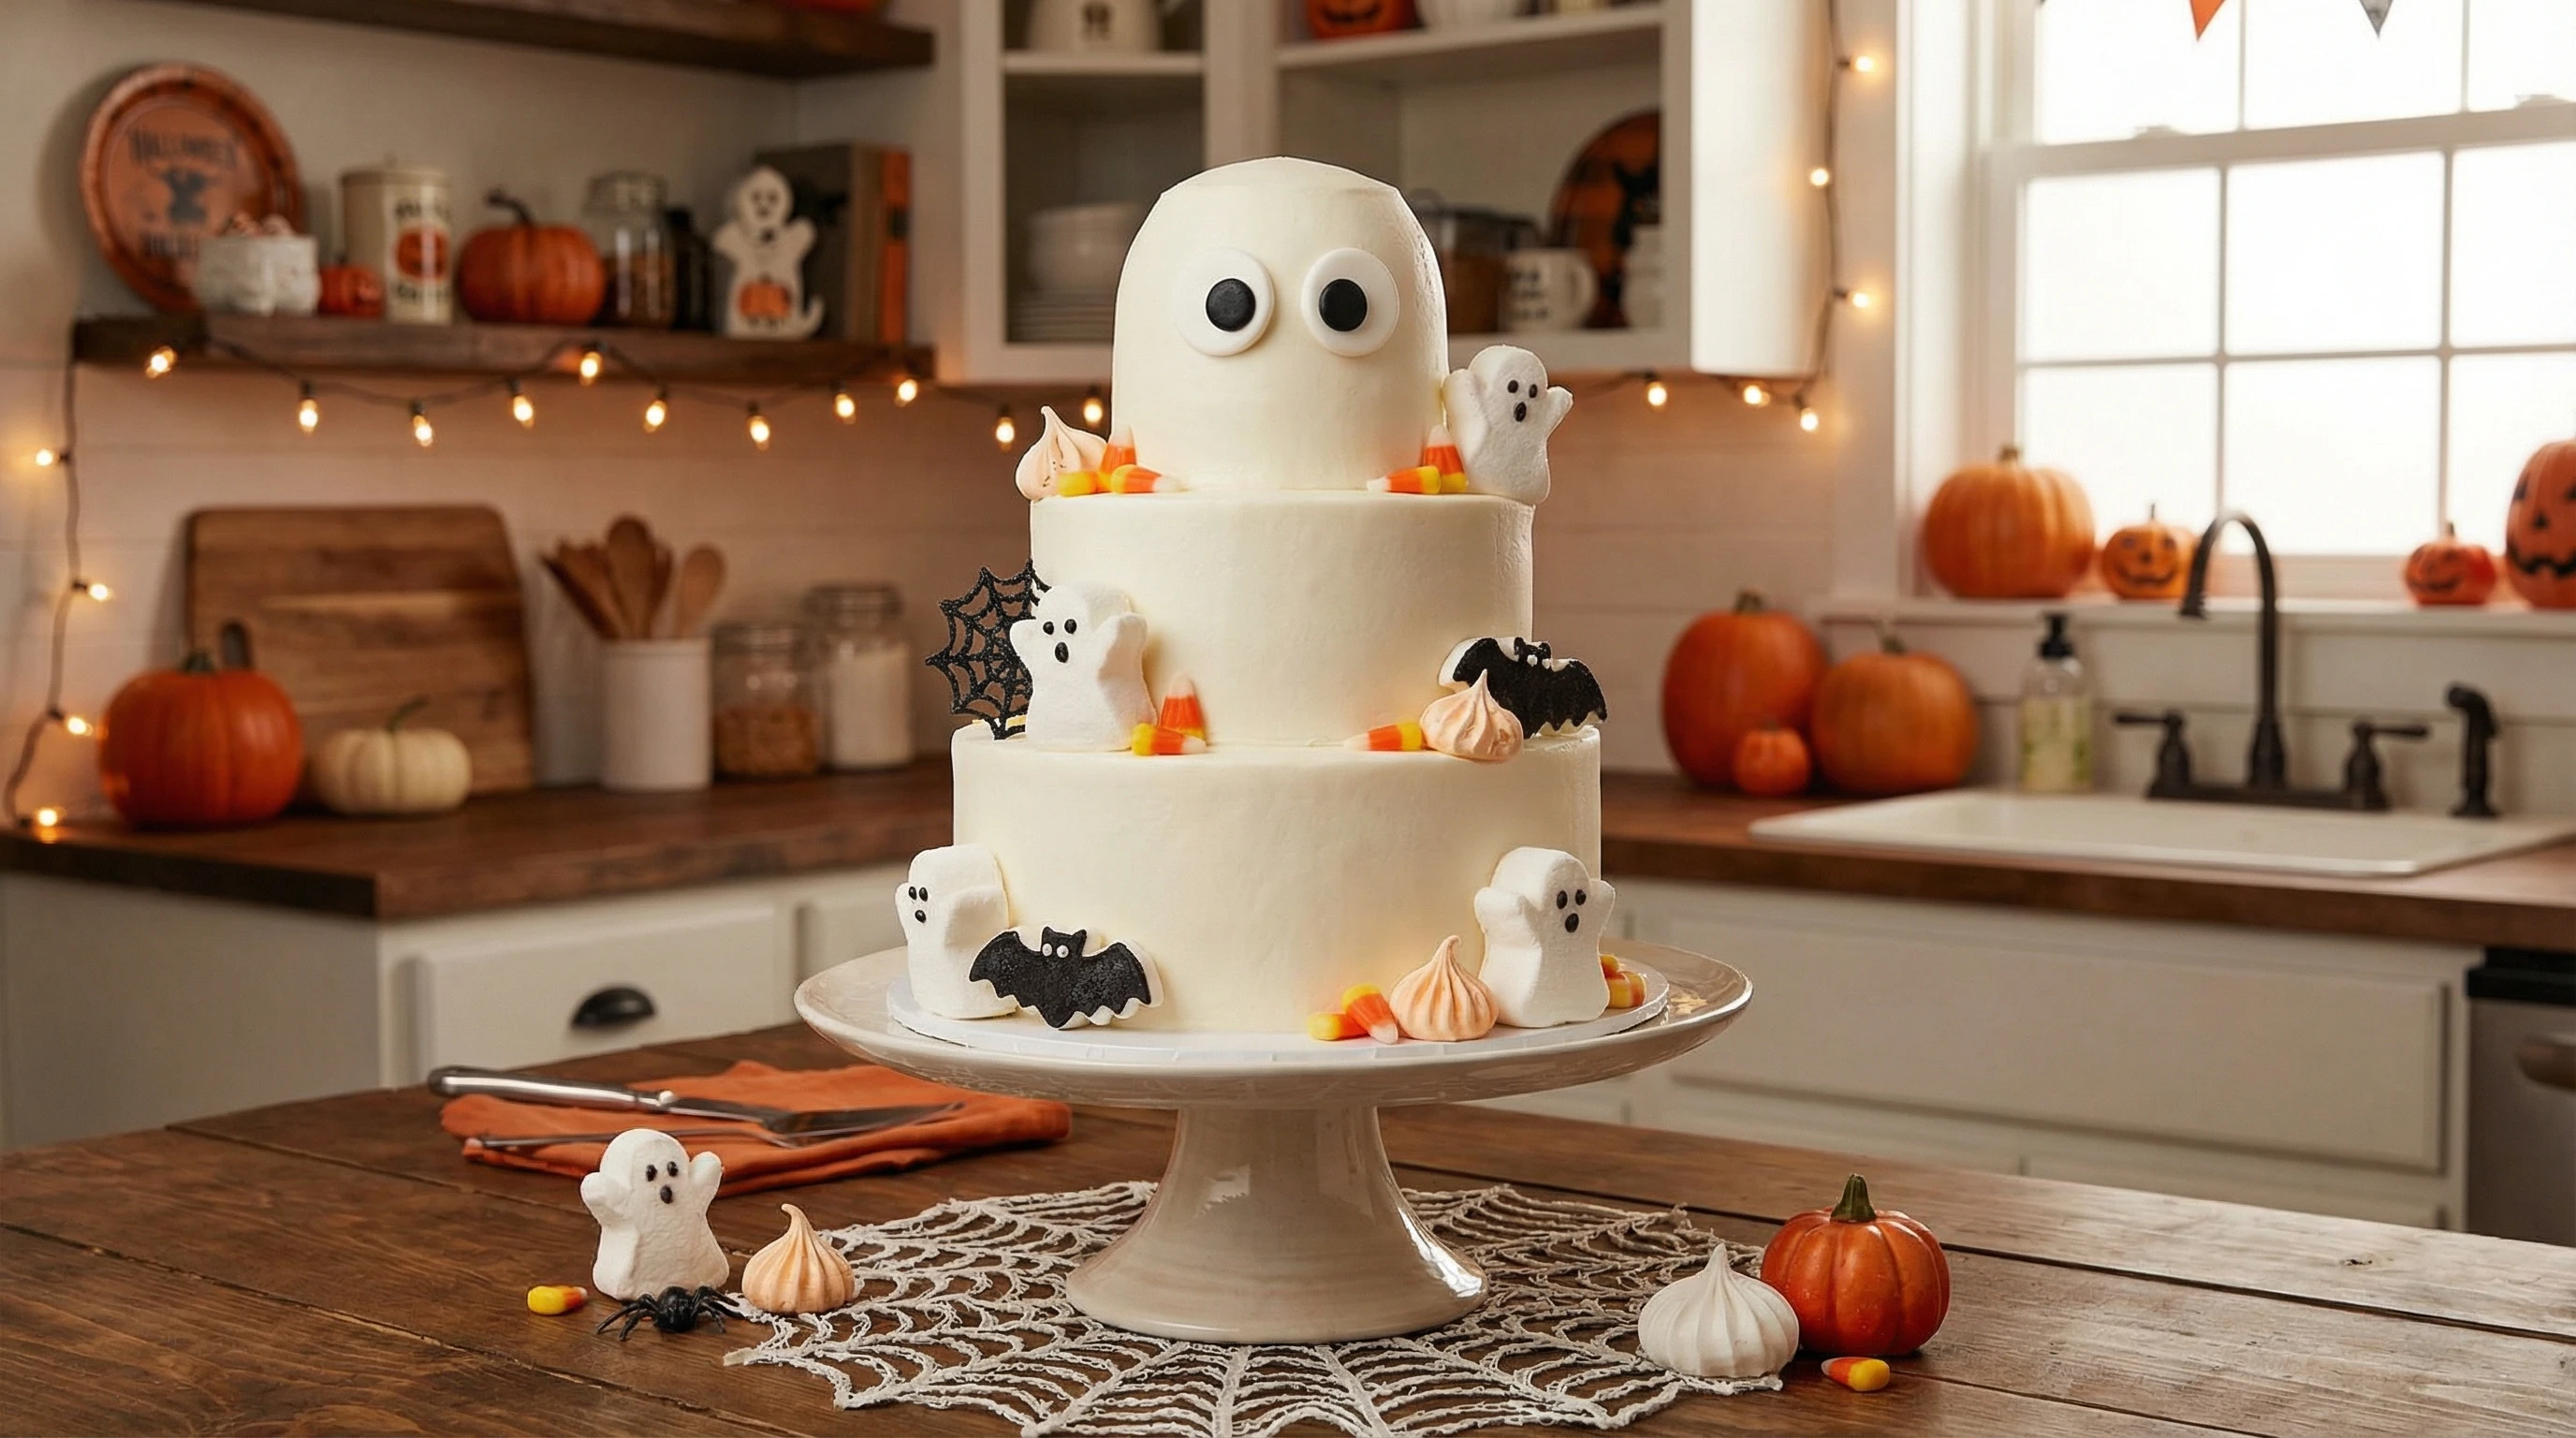
Making a ghost cake is a fun and creative way to bring some spooky charm to your dessert table. Whether it’s for a Halloween party, a birthday, or just a themed gathering, this cake will impress both kids and adults. A ghost cake usually looks like a friendly (or maybe a slightly mischievous) ghost popping out of a fluffy, sweet surface. I’ll walk you through the key steps to whip up a ghost cake at home. We’ll look at a straightforward recipe, tips for decorating, and ideas to help your ghost cake come out looking and tasting awesome.
What Makes a Ghost Cake Special?
The fun part about ghost cakes is how simple ingredients can turn into an eye-catching treat. The classic ghost cake is all about playful presentation: think smooth white frosting, little black eyes, and a shape that’s unmistakable. But there’s more to it than just looks. The cake underneath can be any flavor you enjoy, letting you have some flexibility and fun with each bake. Ghost cakes are a lighthearted nod to Halloween traditions, making them a hit in classrooms, office get-togethers, or any fall festivity.
Unlike cakes that require advanced baking skills, ghost cakes are pretty straightforward. You don’t need professional level tools, just a bit of imagination and the willingness to get creative with frosting and toppings. This makes ghost cakes a fun family baking project, easy enough for helpers of any age to join in.
Step-by-Step Ghost Cake Recipe
I like keeping things practical, so this recipe uses basic ingredients and standard kitchen tools you probably already have. Here’s what you need to make a classic ghost cake:
- Cake Base: One 8 inch vanilla or chocolate cake (homemade or from a box mix works perfectly)
- Buttercream Frosting: Enough to coat and mound on top (about 3 cups), dyed white with gel or liquid food coloring if necessary
- Black Candy Melts, Mini Oreo Cookies, or Chocolate Chips: For making eyes
- Marshmallows or Ice Cream Cones: For shaping the ghost form on top
- Optional: Edible glitter, silver sprinkles, candy corn, or extra small candies for decoration
Instructions:
- Bake Your Cake: Prepare your favorite cake recipe (or boxed mix) as directed. Let the cake cool completely before decorating.
- Shape the Ghost: For a simple design, you can mound one large marshmallow or a trimmed ice cream cone upside down on top of the cake for the ghost’s “head.” For a 3D ghost effect, stack cupcakes or extra pieces of cake to form a dome before frosting.
- Apply a Crumb Coat: Cover the entire cake and ghost form with a thin layer of buttercream to trap crumbs. Chill for at least 30 minutes.
- Frost Generously: Using an offset spatula or butter knife, add a thick layer of white buttercream over the whole cake, blending up and over the ghost “head” to make it smooth and puffy. Don’t worry about it being too perfect. Wavy frosting looks more like floating fabric, which is super cute for ghosts.
- Add the Face: Press two black candies, chocolate chips, or Oreo pieces into the buttercream to make eyes. You can use a small dot of black frosting for a mouth or leave it off for a simple, mysterious look.
- Final Touches: Sprinkle edible glitter or add decorative candies around the base for a festive finish. Place the cake in the fridge if not serving right away, or enjoy it immediately.
Make It Your Own: Easy Ghost Cake Variations
If you want to mix up this recipe, you have lots of options. Here are a few of my go to variations for making ghost cakes that match your style or party theme:
- Spooky Chocolate Drip: Melt some dark chocolate and drip it around the edge of the frosted cake for a spooky, haunted look.
- Mini Ghost Cakes: Use cupcakes or small loaf cakes as your base. Shape a little ghost topper on each, using mini marshmallows or piped frosting blobs for the “floating” effect.
- Reverse Ghost: Go for a black velvet cake (color your batter with black cocoa or food coloring) and top with white frosting to really make your ghost stand out.
- Funfetti Surprise: Mix rainbow sprinkles into your batter for a colorful, party ready interior once you slice in.
If you want to add personality, try shaping your ghost with different “arms” made from piped frosting or even licorice strings. Using playful accents like candy bats or edible eyeballs around the base makes everything feel even more festive. Don’t be afraid to play with flavors—orange zest in the cake, a hint of mint in the frosting, or a hidden layer of jam all add something special.
Baking Tips for a Crowd-Pleasing Ghost Cake
Some handy baking tips can really help, especially if you want your ghost cake to look extra smooth or you’re baking for the first time:
- Chill your cake before frosting. Cold cake is easier to cover cleanly, and the frosting sticks better.
- If your buttercream is too soft, pop it in the fridge for a few minutes so it doesn’t lose its shape while you work.
- If you make mistakes with the eyes or decorations, you can use a clean butter knife to gently remove bits of frosting and start again.
- For extra “spook,” place a little LED tea light behind the ghost or use glow in the dark sprinkles for nighttime parties!
Don’t worry if your ghost cake isn’t totally perfect. Those little quirks just add to its homemade charm! Using parchment paper under your cake before frosting makes cleanup easier, and lifting it away after you’re done leaves a neat, festive presentation.
Tricks for Decorating Like a Pro
Ghost cakes are all about that adorable, floating look. Here’s how I keep things easy and fun while still getting great results:
Soft, Wavy Frosting: Let your spatula make gentle curves and waves as you frost. Ghosts don’t need to look perfectly smooth since windy rippled “fabric” makes them even more charming.
Big, Expressive Eyes: Oversized candy eyes or drawing on little eyebrows with black icing makes for a playful personality. Kids especially love these little touches.
Simple Accents: Sometimes less is more. Stick to black and white for a classy look, or add a few pops of orange with candy corn if you want it more playful. You can also dust the ghost with powdered sugar for a soft, glowing look or add cutout shapes from fondant for extra detail.
Common Ghost Cake Questions
It’s normal to have a few questions before jumping into your first ghost cake. Here are some things I get asked pretty often:
How far ahead can I make a ghost cake?
Most ghost cakes will stay fresh for about 2-3 days if you store them in the fridge. The frosting keeps moisture in, so the cake doesn’t dry out. Just let it rest at room temperature for 30 minutes before serving for the best texture.
What frosting works best?
Buttercream is my go to because it’s fluffy, easy to smooth, and pretty forgiving. You can also use cream cheese frosting or marshmallow fluff for a stickier, sweeter finish. Just make sure it’s white enough to look like a ghost—add a little splash of white gel coloring if needed.
Can I freeze ghost cake?
Yep, but it’s better to freeze just the baked cake layers and decorate after thawing. Buttercream can get a little weird in the freezer and sometimes loses its shape as it comes back to room temperature. If you have leftovers, it’s totally fine to pop slices in the freezer for up to a month.
Can I use a store bought cake?
Absolutely. If you’re short on time or don’t love baking from scratch, use a plain store bought cake as your canvas. Just scrape off any existing icing if you need to, then go ahead with your ghosty makeover!
How can I transport my ghost cake safely?
If you need to move the cake, chill it well before transport and use a cake box. This helps keep the frosting firm and the ghost form in place. Carry it on a flat surface and be gentle with bumps along the way.
Ghost Cake Fun for All Ages
Baking a ghost cake brings some lighthearted fun, especially if you get others involved. Kids love popping the candy eyes onto the frosting, while older helpers can help with shaping or piping details. Ghost cakes are perfect for bake sales, classroom parties, or just as a rainy afternoon activity with some music in the background. It’s kind of amazing how a handful of basic ingredients can become something so festive and crowd pleasing.
When I make ghost cakes for parties, I like to place them on a cake stand, surrounded by candy pumpkins or mini marshmallows. It instantly makes the table feel like a celebration, and people always want to take photos before the first slice is cut.
Get creative with serving: use Halloween plates, scatter a few spider rings, and sprinkle some crushed cookies around the base for a “dusty” graveyard effect. You could even make individual ghost cakes for party favors, so everyone goes home with a tasty (and a little spooky) treat.
Summary
Building your own ghost cake is a playful way to add some tasty magic to your next gathering. You don’t need bakery training. Just some cake, a pile of buttercream, and a bit of creativity. Once you give it a go, customizing and sharing your spooky creation with friends gets easier and more fun each time. If you’re searching for simple ways to create happy (and maybe a little haunted) moments in your kitchen, ghost cake is definitely worth a try. Jump in and give your dessert table a next-level cool look this season!